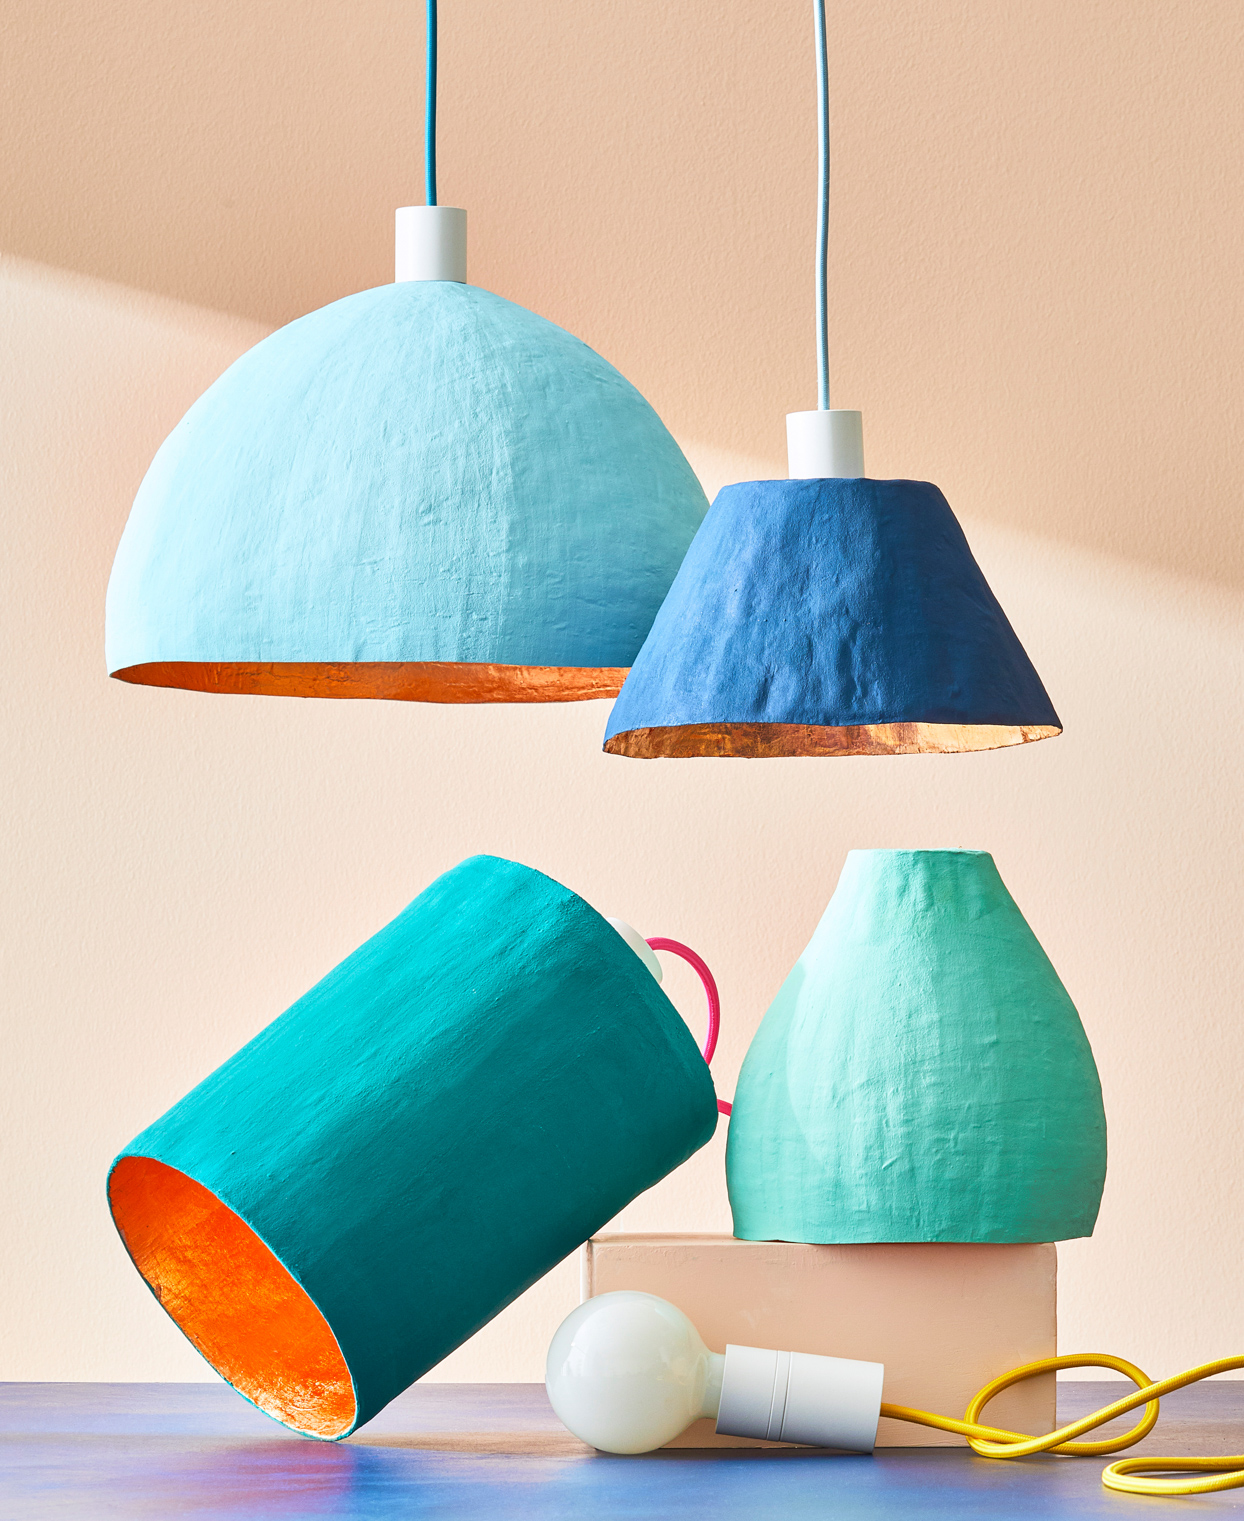
DIY:纸扎灯

 DIY:纸扎灯

Brandon Miller

    首先要知道的是 纸浆 烹饪:清理工作并不困难,穿上围裙,用保鲜膜盖住工作面,就可以无忧无虑地处理混合物了!最重要的是:你可能会在储藏室的架子上找到所有材料。

    要制作这个灯具,要剪一个有弹性的纸板(如麦片盒),用胶带封住。 最后用几层粉笔画和铜箔。 找出你需要的确切内容以及如何做:

    材料

    • 小麦粉
    • 薄纸板麦片盒
    • 报纸
    • 剪刀
    • 热胶
    • 竹签子
    • 粘性胶带
    • 厚纸板
    • 挂件插座和电缆组
    • 铅笔
    • 刷子
    • 白色底漆
    • 粉笔画
    • 海绵刷
    • 铜板纸
    • 黏合剂贴面
    自己动手:羊毛灯
  • 家具和配件 灯具:如何使用和趋势
  • DIY 9个DIY灵感,打造更时尚的灯具
  • 说明

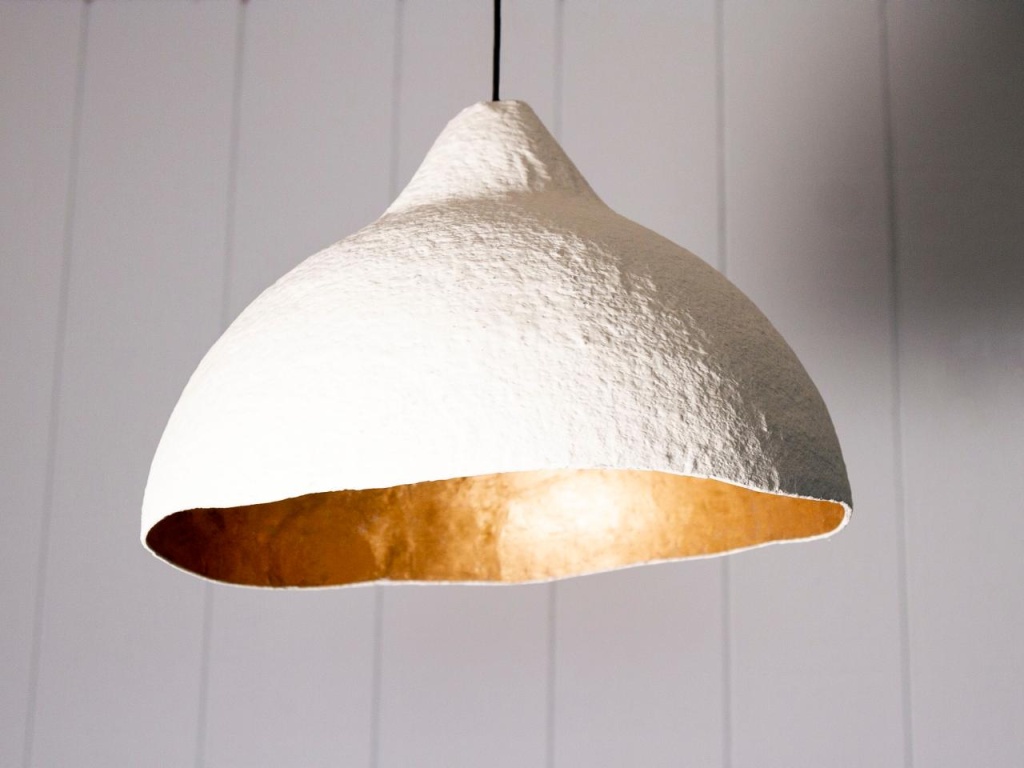
    铜箔装扮了这些吊灯罩的内部。 为了安全起见,请使用LED灯。

    第1步:制作纸糊糊

    在锅中用中火加热2杯水和1汤匙盐。 在碗中将半杯面粉与半杯冷水混合至无结块,然后加入锅中。 轻轻煮沸,搅拌2-3分钟,直到混合物变稠成布丁状。 使用前请先冷却。

    第2步:吊坠的形状

    用塑料布盖住桌子,以保护你的工作空间。 把报纸撕成2.5厘米宽的条状,然后再撕成小块。 把纸板箱压平,在接缝处剪开。 在纸板的一条边上加上热胶。

    在其中一个长边上测量并标记1.27。 用热胶将两个1.27厘米的小边片粘在标记线下面。 将开放的短边重叠起来形成圆柱体,用热胶固定。 沿着两个接缝处涂胶。

    第3步:添加照明组件

    将竹签切成四根7.6厘米长的竹签。 切两个8.89厘米长的纸板圆圈。 在每个圆圈的中心描画出吊坠,用触笔切一个稍大的孔。

    在继续之前,要确保吊坠会松动。 在两个纸板圆圈之间均匀地放上几块手串,使用热胶,让其干燥。 将手串放在盒子的内侧边缘,用热胶粘牢。 也用绉绸胶带固定。

    See_also: 如何装饰一个小的美食区

    第4步:纸糊的形状

    覆盖报纸条,用手指滑动报纸条去除多余的糊状物。 垂直放置,直到挂件内外都被覆盖。 在圆柱体中放置一个充气的气球以保持其形状,工作时将其放在碗中。

    横向涂抹一层,待其干燥 重复上述步骤,始终等待干燥,直到结构坚硬为止 用较小的报纸条覆盖烤串和中心圆,待其干燥一晚。

    第5步:绘画

    在吊坠的外侧和内侧涂上白色底漆,待其干燥。 涂上两层白垩漆,待其干燥。 用海绵刷在作品的内侧和铜质饰面上涂上胶质饰面。 完全干燥后,加上吊坠并悬挂。

    *Via Better Homes & Gardens

    See_also: 胶合板:了解所有关于镶板的知识 什么是与复活节菜单相协调的最佳葡萄酒?
  • 我的家 12个复活节的DIY装饰品
  • 我的家居DIY:用这些毛毡兔子照亮你的家
  • Brandon Miller

    Brandon Miller is an accomplished interior designer and architect with over a decade of experience in the industry. After completing his degree in architecture, he went on to work with some of the top design firms in the country, honing his skills and learning the ins and outs of the field. Eventually, he branched out on his own, founding his own design firm that focused on creating beautiful and functional spaces that perfectly suit the needs and preferences of his clients.Through his blog, Follow Interior Design Tips, Architecture, Brandon shares his insights and expertise with others who are passionate about interior design and architecture. Drawing on his many years of experience, he provides valuable advice on everything from selecting the right color palette for a room to choosing the perfect furniture for a space. With a keen eye for detail and a deep understanding of the principles that underpin great design, Brandon's blog is a go-to resource for anyone who wants to create a stunning and functional home or office.